
How to Install WordPress with Varnish Cache (Ubuntu/Nginx)

Table of Contents
Introduction
When you think of WordPress, what are the first thoughts that come to mind? Slow? Bloated? Just plain too much? It seems all but too many people have turned to WordPress to build their web sites. Not because it’s the best there is to offer, but because of its simplicity, and ease of use. In the digital day and age, many people want to get on the web and be heard, or have their product showcased to the world, and thanks to WordPress, they don’t have to recruit their 13 year-old nephew to build a website for them. With WordPress’ vast marketplace of themes and plugins, anyone can spin up WordPress, and build the website they’ve always wanted.
In 2011, 13.1% of all public websites were powered by WordPress. Today, that number has climbed to 34%. With this steep incline over the past decade, it’s safe to say that WordPress isn’t going away anytime soon. But what does that mean in terms of SEO?
As a lot of SEO engineers have noticed, WordPress isn’t the fastest CMS engine to host, especially paired with hosting providers like Go Daddy, Host Gator, or countless other $5 shared hosting sites available. This creates problems when ranking on top search engines, because their goal is to deliver fast and reliable results to their users. Not to mention, today’s web surfers have high expectations when it comes to page load times.
Now there are specialty hosting providers that try to key in on delivering WordPress sites quickly, like Kinsta or WP Engine, but even they have some pitfalls. The best option out there is to self-host, especially with providers out there like Digital Ocean, that make cloud-based hosting simple and affordable. Only issue is you have to get your feet wet with Linux, and its command line. Scary, right? Well, our goal today is to help ease those fears and introduce you to Varnish Cache.
The Stack
When it comes to hosting a web application like WordPress, there are some things that need to be accounted for when setting up your server. How much traffic are we planning on getting? Where are our users located? How many people will be viewing our site from a mobile device on 3g/4g/5g?
These are all very important questions that have helped us determine the best stack for our site at Ciffone Digital. When we set up our hosting, we had one goal in mind:
Deliver quality content to our end users as quickly as possible, while maintaining affordability.
To achieve this goal, we turned to LEMP and Varnish. We run 2 servers on Digital Ocean out of NYC to serve our content across the globe.
LEMP
LEMP is an acronym that stands for Linux, Nginx (E because it is pronounced engine-x), MySQL, and PHP.
Linux is an operating system much like Windows or Mac OS X, that is open source and free to use and distribute. Unlike Windows and OS X, Linux comes in many different flavors, such as Ubuntu, Fedora, Debian, Arch, and the list goes on. It is said that 96.3% of the top 1 million websites run on Linux.
Nginx is a popular, and somewhat newer web server on the market, that has gained a lot of popularity for its performance, reliability, and ease of use. Like Linux, Nginx is free to use and distribute, as well as open source. Web servers are used to deliver web site content to an end user. Every time you go to your favorite websites, it was delivered to you by a web server.
MySQL is a popular database server, used to store data for the long term. Though MySQL is proprietary software (owned by Oracle), there is a closely related open-source solution called MariaDB.
PHP is a scripting language, mainly used in web development. WordPress, as well as many other popular CMSs like Drupal, Magento, Joomla, Etc., are built with PHP. Most web developers choose to pair PHP with MySQL because of its simplicity and ease of use.
Varnish
Varnish is a caching server, built to accelerate web application performance. Varnish is typically installed in front of your web application to help ease the need to query your database several times for the same requests. Varnish has been known to speed up content delivery from 300x – 1000x, depending on what’s being served. One of the main factors that drives Varnish’s popularity besides performance, is its rich and flexible configuration language, VCL.
If this all seems confusing, think of it this way; say you take a picture and send it to your friends. Every time you want to send that picture to your friends, you take it again. What if instead, you want to send a copy of the picture you sent. If the picture never changes, then you should be able to send that same picture every time, instead of taking a new one. This is what varnish does for your website.
WordPress stores a lot of its information in a database, from posts, comments, and pages, to user information and site configurations. Between the time it takes to query this information, and PHP to process it into a readable format, that’s a lot of time. Especially if it’s being done constantly to create the same web page over and over again.
So instead of constantly spending this extra time to serve a web page, Varnish saves this information and serves it until the page has new content to serve, saving precious processing time for you, and wait time for your users.
What You’ll Need
Before we can begin our journey, there’s a few things we’ll need to get our servers setup.
A Terminal w/ SSH
To connect with our servers, we’re going to need an SSH client. SSH (Secure Shell) is software that allows us to connect to our Linux servers and run commands. Without SSH, we would need to physically be at our servers to administrate them.
On Linux and Mac OS X, we’re all set and ready to rumble, since SSH is already installed on our command line. But if you’re on Windows, I regret to inform that we’ll need an SSH client before we can continue forward.
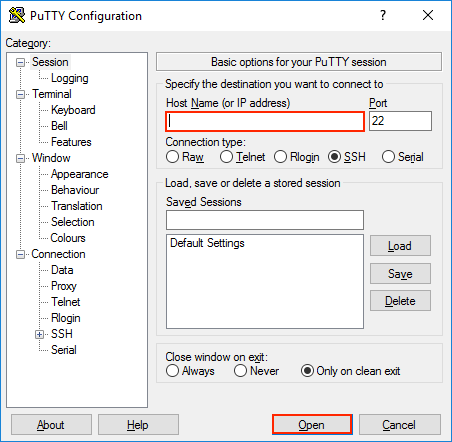
For this, I recommend PuTTY for our SSH client. It is a free and opensource program that allows you to use SSH on Windows, while packaged inside a friendly and easy to use graphical interface. You can download the latest version of PuTTY from here:
https://www.chiark.greenend.org.uk/~sgtatham/putty/latest.html
After you have downloaded and installed PuTTY, go ahead and open it. You’ll find a lot of options you can choose from, but for our use case, we just need the “Host Name (or IP address)” section.
**Note: For this tutorial, we will be using the root account.
VPC Network
In order for our servers to communicate with each other, we’ll need to create a VPC Network, otherwise, the traffic between our web server and cache server could be viewed since the traffic is going over the internet in plain-text.
Go ahead and use the the following article from Digital Ocean to setup a VPC Network.
Servers
The other thing we will need for our fast WordPress hosting will be servers to host WordPress on. I will be using Digital Ocean to procure the servers needed to host our WordPress site. If you haven’t already, go ahead and sign up for an account with Digital Ocean. Upon signing up, you will be given a free $100 credit to use for your hosting on Digital Ocean.
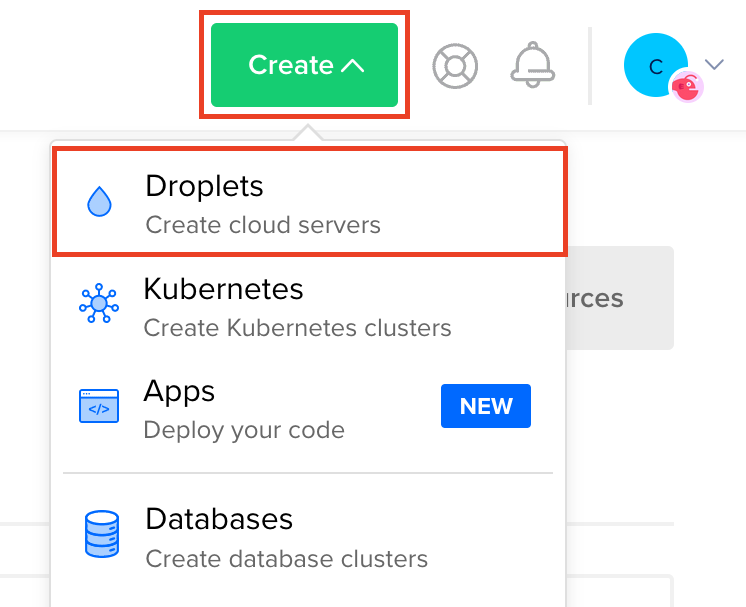
Once you have your new account, Log in, and you will be greeted with a dashboard. From there, click on the green “Create” button, which should drop down a list of options. Next, click on “Droplets”, and this will take us to a new page.
We will need to do this step twice, since we’ll need two servers. Here are the specs I used for each server:
Web Server
- Distribution: Ubuntu 20.04 (LTS) x64
- Plan: Basic, Regular Intel
- 2 CPU, 4GB RAM, 80 GB SSD
- Datacenter: NYC3
- VPC Network: example-vpc
- Additional Options: Monitoring
- Authentication: Password
- Hostname: web-server (you can change this to whatever you want, but I will refer to this server by this hostname)
Cache Server
- Distribution: Ubuntu 20.04 (LTS) x64
- Plan: Basic, Regular Intel
- 1 CPU, 2GB RAM, 50 GB SSD
- Datacenter: NYC3
- VPC Network: example-vpc
- Additional Options: Monitoring
- Authentication: Password
- Hostname: cache-server (you can change this to whatever you want, but I will refer to this server as this)
Implementation
Before We get started, it’s best we grab a few bits of information before configuring our servers. What we’ll need is the following:
- Web Server ipv4
- Web Server Private IP
- Cache Server ipv4
- Cache Server Private IP
- Domain Name (i.e. example.com)
To find these items above, go into your digital ocean console and navigate to the servers you’ve created. Click on each server, and in a bar right under the server’s name, you’ll see “ipv4” and “Private IP”. Copy these values for each server.

Next, we’ll need to point our Domain Name to our Cache Server ipv4 address. You’ll need to do this in the control panel for whichever Domain Authority you use for hosting your Domain Name (Go Daddy, Namecheap, etc.). Create an A record with a TTL of 300 and point it to your Cache Server ipv4.
After that’s done, we can proceed. I will break this down in to 3 parts, configuring the Web Server, Configuring the Cache Server, and Configuring WordPress for the Cache Server. Let’s begin.
Part 1: Configuring the Web Server
We’re going to login to our Web Server. On Linux/OS X, open a terminal, and run the following command, replacing *web_server_ipv4* with your Web Server ipv4:
ssh *web_server_ipv4* -l root
On Windows, open putty, and in the hostname field, enter your Web Server ipv4 address, then click the open button.
Input the password you entered when creating the Web Server in the Digital Ocean console. If you don’t see any characters while typing, don’t be alarmed, this is normal.
Step 1: Install Important updates
Run the following command to install security updates and bug fixes:
apt update && apt upgrade -y
Step 2: Install & Configure MySQL
Run the following command to install MySQL:
apt install -y mysql-server mysql-client
Once that command has finished installing, run the next command to configure MySQL and remove test data:
mysql_secure_installation
While this command is running, you’ll need to enter the following:
- Validate password component: answer y or n, but if you answer y, you will need to specify the complexity in a single digit form, 0 being LOW, and 2 being HIGH.
- Enter and renter a new password for the root user.
- Remove anonymous users?: y
- Disallow root login remotely?: y
- Remove test database and access to it?: y
- Reload privilege tables now?: y
Now, you will run the following command to login to MySQL as the root user:
mysql -u root
This next list of commands will prepare the database for your new WordPress installation. Run the commands, replacing *password* with a secure password for this user:
CREATE DATABASE wordpress;

CREATE USER 'wpuser'@'localhost' IDENTIFIED BY '*password*';

GRANT ALL PRIVILEGES ON wordpress.* TO 'wpuser'@'localhost';

FLUSH PRIVILEGES;

exit
Step 3: Install & Configure Nginx and PHP
We’re going to setup our webserver now. To get started, lets install Nginx, PHP, and all the libraries we’ll need to run wordpress:
apt install -y nginx php-fpm php-mysql php-curl php-gd php-intl php-mbstring php-soap php-xml php-xmlrpc php-zip
Now, we’ll need to setup our Nginx config. Open /etc/nginx/sites-available/web.local:
nano /etc/nginx/sites-available/web.local
and add the following configuration:
server {
    listen 80;
    index index.php index.html index.htm;
    server_name web.local;
    root /var/www/html;

    location / {
        try_files $uri $uri/ /index.php$is_args$args;
    }

    location = /favicon.ico { log_not_found off; access_log off; }
    location = /robots.txt { log_not_found off; access_log off; allow all; }
    location ~* \.(css|gif|ico|jpeg|jpg|js|png)$ {
        expires max;
        log_not_found off;
    }

    location ~ \.php$ {
        include snippets/fastcgi-php.conf;
        fastcgi_pass unix:/var/run/php/php7.4-fpm.sock;
    }

    location ~ /\.ht {
        deny all;
    }
}
Press Ctrl + x, enter y, then press Enter to save and close the file.
We can now enable our new configuration:
ln -s /etc/nginx/sites-available/web.local /etc/nginx/sites-enabled/
and disable the default configuration:
unlink /etc/nginx/sites-enabled/default
and finally, to reload all the configurations, we’ll restart Nginx:
systemctl restart nginx
Step 4: Install & Configure WordPress
Now we’ll install WordPress, and configure it use our local MySQL database. Let’s start by going in to our /var/www directory:
cd /var/www
Then we’ll pull down the latest version of WordPress from wordpress.org:
wget http://wordpress.org/latest.tar.gz
Let’s unarchive the installation:
tar -xzf latest.tar.gz
And move the WordPress files in to the Nginx web root:
mv wordpress/* html/
Now let’s cleanup from installing the WordPress files:
rm -rf wordpress/ latest.tar.gz
Next, we’ll need to set the owner of our WordPress installation to www-data:
chown -R www-data: html/
Then let’s configure all the directories in the html/ folder to the proper permissions:
find html/ -type d -exec chmod 750 {} \;
And configure all the files in the html/ folder to the proper permissions:
find html/ -type f -exec chmod 640 {} \;
Now, go to https://api.wordpress.org/secret-key/1.1/salt/ and save the contents in the webpage to the side for a moment.
We’re now going to configure our wp-config file. This will allow our WordPress installation to communicate with our local MySQL database. Open /var/www/html/wp-config.php:
nano /var/www/html/wp-config.php
Next, paste in the following, replacing *password* with the wpuser password you created earlier, and /** ADD SECRETS HERE */ with the output from the webpage you just set aside not too long ago:
<?php

define( 'DB_NAME', 'wordpress' );
define( 'DB_USER', 'wpuser' );
define( 'DB_PASSWORD', '*password*' );
define( 'DB_HOST', 'localhost' );
define( 'DB_CHARSET', 'utf8' );
define( 'DB_COLLATE', '' );

/** ADD SECRETS HERE */

/** WordPress database table prefix. */
$table_prefix = 'wp_';

/** WordPress debug mode */
define( 'WP_DEBUG', false );

/** Force SSL with varnish proxy */
if (strpos($_SERVER['HTTP_X_FORWARDED_PROTO'], 'https') !== false) {
    $_SERVER['HTTPS']='on';
}

/************************************************* */
/** IMPORTANT: Do not add anything below this line */
/************************************************* */

/** Absolute path to the WordPress directory. */
if ( ! defined( 'ABSPATH' ) ) {
    define( 'ABSPATH', __DIR__ . '/' );
}

/** Sets up WordPress vars and included files. */
require_once ABSPATH . 'wp-settings.php';

?>
Press Ctrl + x, enter y, then press Enter to save and close the file.
Now, Let’s set the owner of the wp-config.php file:
chown www-data: /var/www/html/wp-config.php
And set the permissions of the wp-config.php file:
chmod 600 /var/www/html/wp-config.php
Part 2: Configuring the Cache Server
We’re going to login to our Cache Server. On Linux/OS X, open a terminal, and run the following command, replacing *cache_server_ipv4* with your Cache Server ipv4:
ssh *cache_server_ipv4* -l root
On Windows, open putty, and in the hostname field, enter your Cache Server ipv4 address, then click the open button.
Input the password you entered when creating the Cache Server in the Digital Ocean console. If you don’t see any characters being inputted, don’t be alarmed, this is normal.
Step 1: Install Important updates
Run the following command to install security updates and bug fixes:
apt update && apt upgrade -y
Step 2: Install & Configure Varnish Cache
We’re going to begin by installing and configuring Varnish Cache. Go ahead and run the following command to install Varnish on our machine:
apt install -y varnish
Next, we’re going to create a local entry in /etc/hosts to point web.local to our Web Server. Replace *web_private_ip* with the Web Private IP Address:
echo "*web_private_ip* web.local" >> /etc/hosts
Let’s backup the default varnish config:
cp /etc/varnish/default.vcl{,.bak}
Then we’ll clear out the file:
echo "" > /etc/varnish/default.vcl
Now, We’re going to edit /etc/varnish/default.vcl:
nano /etc/varnish/default.vcl
and input the following configuration, replacing *web_private_ip* with the Web Private IP Address:
# new 4.0 format.
vcl 4.0;

# Default backend definition. Set this to point to your content server.
backend default {
    .host = "web.local";
    .port = "80";
}

acl purge {
    "localhost";
    "*web_private_ip_address*";
}

sub vcl_recv {
    # pass indexing robots
    if (req.http.User-Agent) {
    if (req.http.User-Agent ~ "^facebookexternalhit" ||   #bot
    req.http.User-Agent ~ "Googlebot" ||              #bot
    req.http.User-Agent ~ "bingbot" ||                #bot
    req.http.User-Agent ~ "AhrefsBot" ||              #bot
    req.http.User-Agent ~ "YandexBot" ||              #bot
    req.http.User-Agent ~ "^Baiduspider") {                #uptime monitor
        return (pass);
    }
    }

    # Pass logged in WordPress users and any console url's directly to backend with any modification.

    # pass wp-admin urls
    if (req.url ~ "(wp-login|wp-admin)" || req.url ~ "preview=true" || req.url ~ "xmlrpc.php") {
    return (pass);
    }
    # pass wp-admin cookies
    if (req.http.cookie) {
    if (req.http.cookie ~ "(wordpress_|wp-settings-)") {
        return(pass);
    }
    }

    #catch any non-cacheable sessions and / or WP console pages.
    if (req.http.Authorization ||
    #req.http.Cookie ||
    req.url ~ "wp-(login|admin|comments-post.php|cron.php)" ||
    req.url ~ "preview=true" ||
    req.url ~ "xmlrpc.php") {
    return (pass);
    }

    # we probably caught all of the logged in WordPress users already, but just in case ...
    if (req.http.User-Agent) {
    if (req.http.User-Agent ~ "^Wordpress") {
        return (pass);
    }
    }

    # Do everything we can to make each remaining request cacheable.
    if (req.url ~ "\.(gif|jpg|jpeg|svg|swf|ttf|css|js|flv|mp3|mp4|pdf|ico|png)(\?.*|)$") {
    unset req.http.cookie;
    set req.url = regsub(req.url, "\?.*$", "");
    }

    # drop tracking params
    if (req.url ~ "\?(utm_(campaign|medium|source|term)|adParams|client|cx|eid|fbid|feed|ref(id|src)?|v(er|iew))=") {
    set req.url = regsub(req.url, "\?.*$", "");
    }


    if (req.http.Accept-Encoding) {
    if (req.url ~ "\.(jpg|png|gif|gz|tgz|bz2|tbz|mp3|ogg)$") {
        # No point in compressing these
        unset req.http.Accept-Encoding;
    } elsif (req.http.Accept-Encoding ~ "gzip") {
        set req.http.Accept-Encoding = "gzip";
    } elsif (req.http.Accept-Encoding ~ "deflate") {
        set req.http.Accept-Encoding = "deflate";
    } else {
        # unkown algorithm
        unset req.http.Accept-Encoding;
    }
    }

    # handling purge requests
    if (req.method == "PURGE") {

    if (client.ip !~ purge) {
        return (synth(405));
    }

    if (req.http.X-Purge-Method == "regex") {
        ban("req.url ~ " + req.url + " && req.http.host ~ " + req.http.host);
        return (synth(200, "Banned."));
    } else {
        return (purge);
    }
    }
}

sub vcl_backend_response {
    # this will cache content for 24 hours, with a grace of 1h.
    set beresp.ttl = 24h;
    set beresp.grace = 1h;
}

sub vcl_deliver {
    # Happens when we have all the pieces we need, and are about to send the
    # response to the client.
    #
    # You can do accounting or modifying the final object here.
}
Press Ctrl + x, enter y, then press Enter to save and close the file.
Next, open up the varnish.service configuration:
nano /etc/systemd/system/multi-user.target.wants/varnish.service
Now we’re going to change the line starting with ExecStart, replacing *cache_private_ip* with the Cache Private IP Address:
ExecStart=/usr/sbin/varnishd -j unix,user=vcache -F -a :8080 -T *cache_private_ip*:6082 -f /etc/varnish/default.vcl -S /etc/varnish/secret -s malloc,256
Press Ctrl + x, enter y, then press Enter to save and close the file.
We’ll now reload the varnish.service configuration:
systemctl daemon-reload
And shutdown Varnish for a little bit:
systemctl stop varnish
Step 3: Install & Configure Nginx to handle SSL Termination for Varnish Cache
First, we’re going to start of with installing Nginx. We’ll also be installing certbot to acquire SSL certificates for the WordPress site. Run the following command:
apt install -y nginx certbot
Next, we will acquire our certs from Let’s Encrypt. Run the following command, replacing *email* with your email, and *example.com* with the domain name you are using for your new WordPress site:
certbot certonly -m *email* --manual-public-ip-logging-ok --webroot --preferred-challenges http -w /var/www/html -d *example.com*
The command will ask you to agree to the terms of service (Enter a to agree). Then it will ask you if you want to share your email with the Electronic Freedom Foundation (Enter y or n).
After that, it will verify your domain. if you have not pointed your domain to the Cache Server like asked earlier, this step will fail and error out. you will need to point the domain to the cache server and re-run the above command. If no errors came up, we can continue on.
Next, we are going to create our Nginx config at /etc/nginx/sites-available/cache.https_proxy:
nano /etc/nginx/sites-available/cache.https_proxy
and paste the following configuration, replacing *example.com* with your domain name:
server {
    listen 80;
    server_name *example.com*;
    return 301 https://$host$request_uri;
}

server {
    listen 443;
    ssl on;
    ssl_certificate /etc/letsencrypt/live/*example.com*/fullchain.pem;
    ssl_certificate_key /etc/letsencrypt/live/*example.com*/privkey.pem;
    ssl_protocols TLSv1.2;
    ssl_ciphers HIGH:!aNULL:!MD5;
    server_name *example.com*;

    location / {
        proxy_pass http://127.0.0.1:8080;
        proxy_set_header X-Real-IP $remote_addr;
        proxy_set_header X-Forwarded-For $proxy_add_x_forwarded_for;
        proxy_set_header X-Forwarded-Proto https;
        proxy_set_header X-Forwarded-Port 443;
        proxy_set_header Host $host;

        add_header Strict-Transport-Security 'max-age=31536000; includeSubDomains; preload';
        add_header X-XSS-Protection "1; mode=block";
        add_header X-Frame-Options "SAMEORIGIN";
        add_header X-Content-Type-Options nosniff;
        add_header Referrer-Policy "strict-origin";
    }
}
Press Ctrl + x, enter y, then press Enter to save and close the file.
Now we’re going to enable our new Nginx configuration
ln -s /etc/nginx/sites-available/cache.https_proxy /etc/nginx/sites-enabled/
And disable the default one:
unlink /etc/nginx/sites-enabled/default
Then we’ll restart Nginx to pick up the new configuration:
systemctl restart nginx
And then start varnish up again:
systemctl start varnish
Part 3: Configuring WordPress for the Cache Server
Step 1: Finish Setting Up WordPress
Open up a web browser, and go to the domain name that you set up for your WordPress site. You will then be asked to pick a language. Once selected, click Continue.
Next you will enter info for your new WordPress site, such as your site title, you new admin user, and whether you want search engines to index your site or not.
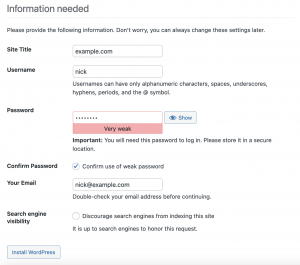
Once you have entered your info, click Install WordPress.
This will lead you to a screen showing the username you set in the last page. click on Login.
Enter you newly created credentials, and login.
Step 2: Setup Proxy Cache Purge Plugin
Once you’re logged in to the WordPress admin dashboard, in the left hand menu, hover over Plugins, and click on Add New.
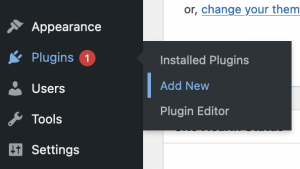
Towards the top right, there is a search bar. Search for “Proxy Cache Purge”. Install the Proxy Cache Plugin by Mika Epstein.
Once Installed, Click Activate.
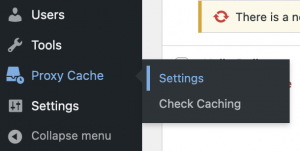
Now that the plugin is installed, go to the left hand menu, and hover over Proxy Cache, and click on Settings.
Then scroll towards the bottom. In the Set Custom IP field, enter 0.0.0.0:6082, Replacing 0.0.0.0 with you Cache Server Private IP. Once you’re done with this, click Save IP.
Conclusion
Now we have a fresh installation of wordpress that is being cached by Varnish. Some things to note:
- The cache will revalidate every 24 hours.
- your SSL certs are only valid for 3 months. To renew, run the following command as root on the Cache Server
certbot renew
- If you make any changes to your site, you’ll need to clear the varnish cache. You can do this by hovering over Cache (Active) in the top bar, and click on Purge Cache (All Pages).
That’s it. If you have any questions, feel free to reach out via the Contact Us form below. Otherwise, best of luck with your new WordPress installation!