
A Better Way to Make Google Analytics Non-Render Blocking
This is a method that I created to load Google Analytics asynchronously with a JavaScript Promise. I recently posted about it on LinkedIn and in the comments, several people mentioned that it’s better than most of the others that show up when you search, so here it is.
Overall, it’s an ideal solution for loading Google Analytics asynchronously to ensure that it is both not render-blocking and preserves your early interaction data.
Developers – the code is below, I put it in the <head>. cheers!
Non-developers – you don’t need to know JavaScript to set this up, simply replace GA_TRACKING_ID_HERE with your unique GA4 measurement ID and don’t forget to put it inside a <script> tag. For those interested in learning how this works, scroll down for an in-depth breakdown of each function and to learn more about asynchronous execution.
function loadGoogleAnalytics() {
    return new Promise((resolve, reject) => {
        // Create the script element for Google Analytics
        const script = document.createElement('script'); // change the variable to 'var' if Elementor
        script.async = true;
        script.src = 'https://www.googletagmanager.com/gtag/js?id=GA_TRACKING_ID_HERE';
        //script.onload = resolve;
        script.onload = () => {  // Remove this function after testing and un-comment the line above this
            console.log("GA script loaded");
            resolve();
        };
        script.onerror = reject;
        document.head.appendChild(script);
    });
}

async function initGoogleAnalytics() {
    try {
        await loadGoogleAnalytics(); // Wait for GA script to load
        window.dataLayer = window.dataLayer || [];
        function gtag(){dataLayer.push(arguments);}
        gtag('js', new Date());
        gtag('config', 'GA_TRACKING_ID_HERE');
        // gtag('config', 'GA_TRACKING_ID_HERE', { 'debug_mode': true }); // Optional to start debug mode
        console.log("Google Analytics initialized successfully."); // Remove after testing
    } catch (error) {
        console.error("Failed to load Google Analytics: ", error);
    }
}

// Execute the function to load and initialize GA
initGoogleAnalytics();
What is a JavaScript Promise?
A Promise is an object representing the eventual completion or failure of an asynchronous operation. Essentially, it’s a placeholder for a value that will be available later on, once an asynchronous task, such as loading a script or fetching data from an API, has been completed.
Here’s a simple way to think about promises:
- When you order a product online, you are given a tracking number (the promise).
- While the product is being shipped, you are in a state of anticipation (pending state).
- When the product arrives, the promise is fulfilled, and you get what you ordered (resolved state).
- If something goes wrong and the product cannot be delivered, the promise is rejected, and you might get a refund or a message explaining what went wrong (rejected state).
Using a promise is much more effective for loading Google Analytics because the code needs to be placed inline in <head> of our HTML document in order to accurately track data. Unless we do something about it, the browser is going to prioritize everything in this section no matter what and execute all of the code before continuing to parse and render the rest of the page. Hence the term “render-blocking”.
Function 1: loadGoogleAnalytics
This function is responsible for dynamically building and loading the GA script without blocking the rendering of any other elements on the page.
In this function we create a new script element using document.createElement(‘script’). This will load gtag.js.
Setting script.async = true ensures that the script is loaded asynchronously with the rest of the page, and then script.src sets the URL. While were here, I’ll add that in sometimes it’s a better idea to host the GA (gtag.js) file locally.
For those unfamiliar with this concept, when something is loaded asynchronously it means the browser can continue parsing and rendering the rest of page without waiting for it to finish loading. In other words, “Don’t wait on me, I’ll catch up with you later”.
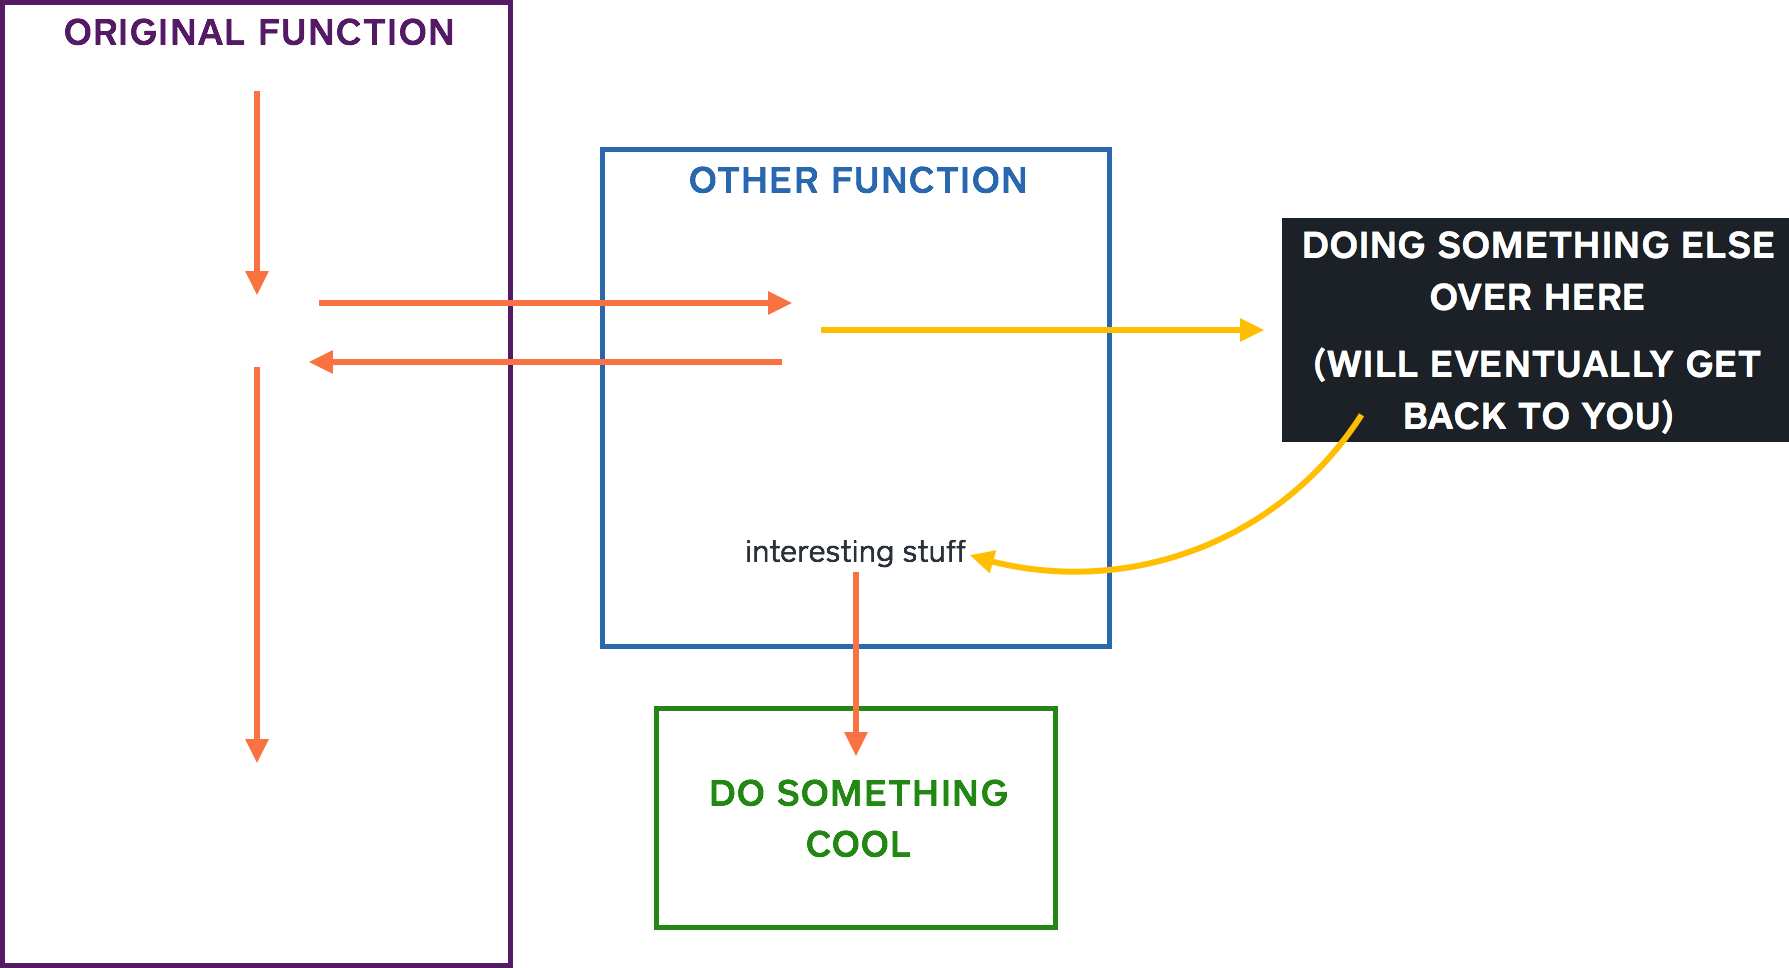
Image by Marie Chatfield
That image is from a great explainer article by Marie Chatfield (they/them) on how asynchronous code execution works.
On successful loading of the script, the onload event handler is called. In the code above I have it logging “GA script loaded” before calling resolve() for debugging purposes. This can be replaced with a simple resolve() call in production. The line to do this is already there just uncomment it.
If for some reason the script fails to load ( perhaps network issues), the onerror event handler calls reject(), which can then be used to handle errors appropriately.
Finally, the script element is appended to the <head> of the document, which initiates the script’s download and execution.
Function 2: initGoogleAnalytics
The next function, initGoogleAnalytics, is asynchronous. It orchestrates the loading of Google Analytics and initializes it with your tracking ID. It calls loadGoogleAnalytics() and awaits its completion. This ensures that the GA script is fully loaded before proceeding. Only once the Promise is resolved will the code continue executing.
window.dataLayer is a global array used by GTM to store event data, variables, and other configurations. If dataLayer doesn’t already exist, the code initializes it to an empty array to avoid errors in subsequent calls. The gtag function is a wrapper around the dataLayer.push method that simplifies sending data to Google Analytics. It takes an arbitrary number of arguments and pushes them onto the dataLayer array.
Finally, the gtag(‘js’, new Date()); line initializes the GA library with the current timestamp, and gtag(‘config’, ‘GA_TRACKING_ID_HERE’); configures GA with your tracking ID. The commented out line below this will enable debug mode in GA4, use it to test your implementation before making the switch.
To recap, here’s a timeline of what happens in this function
- The await loadGoogleAnalytics(); call starts the process of loading the Google Analytics script by invoking the loadGoogleAnalytics function.
- Execution within initGoogleAnalytics pauses at the await line until the Promise returned by loadGoogleAnalytics is either resolved (when the script loads successfully) or rejected (if an error occurs during loading).
- If the script loads successfully and the Promise is resolved, the await expression finishes its wait, and the function execution continues to the next line.
- The window.dataLayer = window.dataLayer || []; line runs only after the await has resolved, ensuring that window.dataLayer is defined and can queue events before the Google Analytics library is initialized with gtag(‘js’, new Date());.
- Subsequent calls to gtag to configure the Google Analytics tracking (gtag(‘config’, ‘GA_TRACKING_ID_HERE’);) will also only execute after the GA script has been loaded and the promise has resolved.
If the code is working properly “Google Analytics initialized successfully.” is logged to the console. This is just for debugging purposes and can be removed or replaced as needed.
If any part of the initialization process fails (for instance, if the GA script fails to load), the catch block logs an error message to the console, helping identify and troubleshoot issues.
Enjoy.
– Mike