
Automatically Generate WebP Images & “Find and Replace” Existing PNG/JPGs

Pass the “Serve Images in NextGen Formats” Recommendation in PageSpeed Insights and speed up your site without simultaneously slowing it down with a heavy plugin.
Table of Contents:
- What is the WebP image format?
- The reason serving WebP images has been so complicated until now
- How to automatically Generate WebPs & Replace Existing Images
Why You’re Probably Here
At one point or another, anyone who calls themselves an SEO or Developer have tested a website on Google’s PageSpeed Insights and seen the following recommendation included in their results:
Serve images in next-gen formats
I assume you’re trying to increase that score and this is one of several boxes to check.
This article will discuss the WebP image format, how it can help improve page load time for mobile users, and also show you the best ways to serve them.
What is a WebP?
WebP is an image format that provides better compression than PNG or JPEG, which means faster downloads and less data consumption.
Short answer:
It’s smaller in size than a JPEG or PNG and can do everything else than those other formats can.
Say less, take me to the script
Long answer:
The WebP image format is an improved way to save images for the web. It’s more efficient than JPEG or PNG because it offers superior lossless and lossy compression, both of which reduce the size of your file without affecting image quality.
Specifically, WebP images offer better compression than PNG and JPEG. When compared to JPEG, WebP typically provides 25-34% smaller file sizes with no noticeable loss in quality.
WebP uses both lossless and lossy compression.
It also supports both animation and transparency (alpha). Its compression and the fact that it does transparency are the biggest advantages to using WebP images.
Using WebP for animated images is compelling.
On the web, GIF images are very popular across sites like Reddit, Twitter, and Instagram – but they’re the most popular outside of the browser.
How many times have you tried to send a GIF in Slack or iMessage but it doesn’t show up animated/moving?
Most likely the file size was too large for the app or device.
Here’s a comparison between a WebP “GIF” and a real an actual GIF. Can you tell the difference?

File size: 120.13KiB (-55.35%), width: 558px, height: 200px, frames: 17, type: WebP

File size: 269.05KiB, width: 558px, height: 200px, frames: 17, type: GIF
It would be great to use these now! The only problem is that GIF has basically become a word for “moving picture” or “memes” .
There are even sites like Giphy that house massive libraries of GIF memes categorized by emotionally descriptive tags.
For these reasons, I doubt that WebP will replace GIF for animation any time soon – at least amongst the general population.
That doesn’t mean we can’t use them to speed up the web!
The reason that serving WebP Images has been complicated
It really came down to browser compatibility.
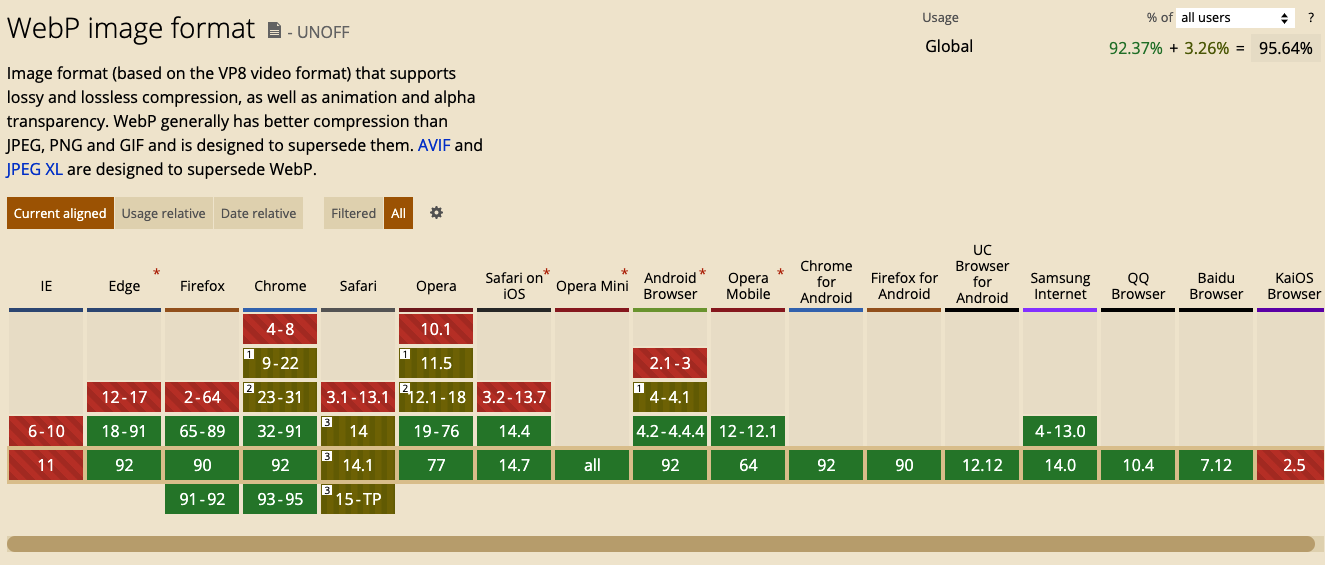
Currently, WebP is supported in the latest versions of all major browsers/operating systems and their niche counterparts.
The only two browsers that do not support it are Internet Explorer and KaiOS Browser.
Internet Explorer 11 is being retired, without continued support, on June 15, 2022.
I say latest versions because until last year, Safari was the only browser holding back WebP.
Before Safari supported the format, if you just uploaded a WebP to your site instead of a JPEG or PNG, there was a high chance that at least some users would just not be able to see your images.
We all know how annoying it is when that broken image icon shows up on a page.
So why all the plugins?
If you wanted to use WebP images on your site, it required a custom configuration at the server level.
Long story short, it wasn’t easy.
The majority of articles on serving WebPs show you how to do it using a WordPress plugin and solicit a favorite. You’ll go down a rabbit hole that ends with fetching your wallet because you don’t remember your CVC.
Existing articles on serving WebP’s without a plugin offer deprecated solutions that include Safari workarounds (without a plugin). They also offer no practical advice to implement them.
To ensure that some users don’t experience broken images, the idea was to dynamically serve images based on user agent.
So when a page is requested, the plugin checks if the user’s browser supports WebP images, and if it does, then they are served images in that format.
If a users browser does not support WebP images, then the plugin falls back to PNG or JPEG.
Except now all popular browsers do support WebP!
iOS 14/macOS Big Sur
On November 12, 2020 WebP support was one of the many Safari improvements shipped with iOS 14, iPadOS 14, and macOS 11 Big Sur.
Here’s a list of all iPhones that support iOS 14:
iPhone 7, iPhone 7 Plus, iPhone 8, iPhone 8 Plus, iPhone X, iPhone XS, iPhone XS Max, iPhone XR, iPhone 11, iPhone 11 Pro, iPhone 11 Pro Max, iPhone 12, iPhone 12 mini, iPhone 12 Pro, iPhone 12 Pro Max, or iPhone SE (2nd generation).
Here are the oldest Mac computers across all models that support Big Sur:
MacBook Pro (Retina, 15-inch, Late 2013), MacBook Pro (Retina, 13-inch, Late 2013), MacBook Air (13-inch, Mid 2013), MacBook Air (11-inch, Mid 2013), MacBook (Retina, 12-inch, Early 2015), iMac Pro (2017), iMac (21.5-inch, Mid 2014), Mac mini (Late 2014), Mac Pro (Late 2013)
If you aren’t concerned about users on iOS versions older than iOS 14 or Macs incompatible with Big Sur, then really there’s no point in investing in dynamic functionality. Just serve WebPs!
To make sure, definitely take a look at your device and OS reports in Google Analytics (or your preferred alternative) to see what technology your users access your site from.
Over the past year or so what percent of your traffic came from users with compatible browsers?
For our site, the total amount of incompatible sessions would have been 8.
All 8 sessions were non returning bounces. On those sessions the user only viewed one page and were there less than 5 seconds. During this time we had dynamic serving enabled, so I’m fairly certain they just weren’t interested.
The best way to serve WebP Images on your website or blog
If your site is very media rich with a lot of PNGs and JPEGs you will without a doubt see increases in your page load performance by by switching to the WebP format.
So now the next question is how?
Option 1: Convert, Upload, and Replace
If you own or manage a large site with hundreds of thousands of JPEGs or PNG images, it will take you a really long time to manually convert them, upload, and replace.
If you have a small website with maybe hundreds of JPEGs and PNG images, you could probably get away with using CloudConvert since it lets you convert more than one image at once. It is also just the one I have always used.
Option 2: A WordPress Plugin
If you’re looking up anything about WebPs and WordPress, you’ve probably seen or read guides and review articles that cite WordPress plugins such as Short Pixel and Optimole as the best ways to accomplish this.
I’m here to tell you that they are not.
Those plugins generate WebPs and then swap them out via htaccess or <picture> tags.
Shortpixel has caused problems on nearly every site I’ve attempted to use it on. I’ve gotten it to work properly, but it was an absolute nightmare.
We built a better way.
Option 3: Use our custom Python program to automatically generate WebPs and replace existing PNG/JPEGs
In my opinion, it is fatuous to download a plugin (let alone paying for one) just to serve optimized images.
Our program works by checking if images on a WordPress site have a WebP equivalent. If the program does not find a WebP image, it generates one, and replaces instances of the existing PNG/JPEG.
It also works for GIFs – replacing existing gifs with an animated WebP
The installation file install.sh will set up a cron to ensure that all new images that get added to your site are automatically optimized. This can be a lifesaver for large websites, such as e-commerce, that might have tens of thousands of existing JPEG or PNG images.
Installation Guide
System Requirements
- Python 3.6+
- WP CLI
Application Requirements
- requests
- pillow
- python-dotenv
- PyYAML
- python-crontab
Step 1 – Pull the code from the repository and then upload it to your server
Open up your terminal/shell and check that you have git installed
git versionPull the repository to your home directory
git clone [email protected]:Ciffone-Digital/WP-Convert-Images-WebP.gitOr if you have the GitHub CLI:
gh repo clone Ciffone-Digital/WP-Convert-Images-WebP
To check that everything worked:
~ % ls -la
drwxr-xr-x   19 mike  staff     608 Oct  2 09:44 webp_check
Step 2 – Uploading the File to Your Server
Now we have to upload this file to our server. There are several ways that you can do this, I will be using SCP.
From SCP’s Man Page:
NAME
     scp — OpenSSH secure file copy

SYNOPSIS
     scp [-346BCpqrTv] [-c cipher] [-F ssh_config] [-i identity_file] [-J destination] [-l limit] [-o ssh_option] [-P port]
         [-S program] source ... target

DESCRIPTION
     scp copies files between hosts on a network.  It uses ssh(1) for data transfer, and uses the same authentication and pro‐
     vides the same security as ssh(1).  scp will ask for passwords or passphrases if they are needed for authentication.
In the last line of the syntax we see [-P port]. When using SCP we typically need to specify a port. If you don’t know the port that your server accepts SSH connections on, you can run the following command with Netstat.
mike@myserver:~$ sudo netstat -tnlp | grep sshd
tcp        0      0 0.0.0.0:22              0.0.0.0:*               LISTEN      737/sshd: /usr/sbin
tcp6       0      0 :::22                   :::*                    LISTEN      737/sshd: /usr/sbin
In the third row we can see our SSH port. For me it is 22. We also need the flag -Trv because we’re uploading a folder, not a standard file.
scp -P 22 -Trv ~/WP-Convert-Images-WebP mike@myserver:/home/mike As soon as you run that you’ll be prompted to enter your SSH key passphrase. Then you’ll see the files get uploaded.
From your home directory on your server, now run -ls -la and you should see the file.
The reason that we SCP to our home directory on our remote server is because accessing a site’s root directory may require sudo privileges, depending on how permissions are set up. Doing it this way will be safe regardless of how your server’s permissions are configured.
Now let’s move the folder we uploaded over to your site’s root directory. If you don’t know the path of your site’s root directory, you can find it easily by running one of these commands:
On Nginx servers:
grep -i 'root' /etc/nginx/sites-enabled/*On Apache servers:
grep -i 'DocumentRoot' /etc/apache2/sites-enabled/*Replace the bracketed items with your information (don’t keep the brackets) and then run the command below:
sudo mv /home/[YOUR USER]/WP-Convert-Images-WebP /var/www/[YOUR SITE'S DIRECTORY]/Step 3 – Gathering the Requirements and Running the Installation File
If you are not sure if you have the requirements installed, you can run the installation file which will take care of that for you.
./install.shRunning the installation file does the following:
- Checks your version of Python to ensure that version 3.6+ is installed
- Checks for the WP CLI binary and installs it if it is not present
- If you meet both requirements, it will:
- Install the required Python dependencies
- Install a cronjob to run every 15 minutes
Step 4 – Additional Setup
To configure, rename .env.default to .env (e.g., mv .env.default .env). In this file, you will find the following environment variables:
CF_API_KEY– The Cloudflare API Key to clear the cache.CF_PURGE_CACHE– Whether or not to clear the Cloudflare cache.CF_ZONE_ID– The Cloudflare Zone ID.SITE_DOMAIN– Site domain (e.g., example.com)FLUSH_DATABASE– Whether or not to clear the WordPress cache.GIF_QUALITY– Quality of GIF.APP_PATH– WordPress application path.BACKUPS_PATH– Backups application path.LOG_PATH– Log path.WP_CLI_YML– WP CLI file path. If you do not have awp-cli.yml, you can use the providedwp-cli.sample.ymlfile by renaming it towp-cli.ymland the checker will use that file (supposedly).